Do you have some WayTags tucked away, but you haven’t used them yet? WayAround’s audio labels for the blind can provide detailed, accessible information for just about anything. You don’t have to be blind or even have poor eyesight to use WayAround, but it was developed for people to use even with no useable vision. Labeling with WayAround doesn’t have to be a big project that takes lots of time. In fact, you can be on your way to getting better information in just ten minutes. So grab those unused WayTags and follow along to get started!
Step One: Create an Account
Estimated Time: 1 minute
In order to label your things, you’ll need to create an account. We require an account so that we can back up your information to the cloud. This means that if you ever get a new device, all you have to do is download the WayAround app and login. Then, voila – all your information will be available to you!
When you create an account, you’ll need just two things: a valid email address and a password. We recommend using an email address that you check regularly. If you ever need to reset your password, you’ll need access to that email address. Your password must contain at least 8 characters and use a combination of uppercase letters, lowercase letters, and numbers. You may use special characters, but you don’t have to.
While you’re on this step, there are a couple of bonus things you can do to make your life easier down the road. First, if you use a password manager, go ahead and save your password!
Next, log on to any device that you may want to use to access WayAround. Only devices that are logged in to your account will be able to read and write WayTags. However, there is no limit to the number of devices that can be logged into your account. If you have multiple smartphones or a tablet, go ahead and login from all of your tech. If you live in a household with others who will also use WayAround – either to read or to write WayTags – have them login to your account from their devices.
Step Two: Adjust Your Settings
Estimated time: 2-3 minutes
WayAround automatically adapts to your chosen smartphone settings, including accessibility settings. The app offers additional settings so you can further tailor your WayAround experience.
To adjust the settings, tap the gear icon in the top right corner of the app. This section will walk you through all of the possible settings.
Your Account
The Your Account section verifies which account you are currently logged in with, which will be displayed as an email address. You can also Log Out here.
WayLink Settings
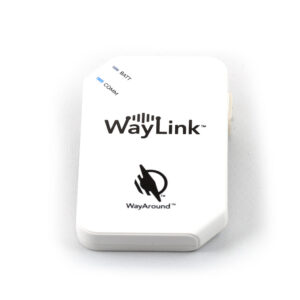
 You may be asking, “What is the WayLink?” The WayLink Scanner is a small, handheld device that scans WayTags and sends the information to your smart device via bluetooth. For most people, the WayLink is an accessory that helps you scan faster. It’s great if you have lots of WayTags.
The app requires that you choose either to scan with your phone or with the WayLink Scanner. To scan with your phone, switch the Use WayLink toggle to the off position. To scan with the WayLink scanner, switch the Use WayLink toggle to the on position.
If you cannot toggle the WayLink switch, your device does not have a built-in NFC reader that is compatible with WayAround and you must use a WayLink to scan. While most smartphones have a built-in NFC reader, any iPhone older than the iPhone 7 requires a WayLink. Most Android devices, even older Androids, have an NFC scanner, but some do not.
Accessibility Settings
WayAround works with the accessibility settings you have selected for your device, however if you’d like to further customize your experience within the WayAround app you can!
The first item under Accessibility Settings is to Speak WayAround Usage Hints. This setting only applies if you are using a screen reader like VoiceOver or TalkBack. Hints provide additional information about using the WayAround app. VoiceOver rotor hints must be enabled to hear WayAround usage hints. To enable WayAround Usage Hints, toggle the switch to the on position.
By default, the Speak WayLink and WayCloud Status Changes option is turned off. This option applies to all users, whether or not you are using a screen reader. The WayCloud Status indicates whether you are currently connected to the internet via wifi or cellular data. When you are connected, a blue cloud appears in the header bar of the app. If you become disconnected from internet access, the WayCloud Status changes to a gray cloud with a line through it. Toggle the speak WayLink and WayCloud Status Changes to the on position to hear an audio indicator when these statuses change, in addition to the visual icon change. Note that you can still read and write WayTags even when you are not connected to the internet. All your WayAround data is saved to your phone and backed up to the cloud. Internet connection is required for backing up your information.
Do you want to hear WayAround without using a screen reader? The Speak WayTag setting is what makes WayTags into audio labels for the blind. You may choose to have the app speak your WayTag descriptions or speak the entire WayTag. Use the dropdown to select your preference. When you select either “description” or “entire WayTag” the app will automatically start speaking to you after you scan a WayTag.
You can also adjust the text size within the WayAround app. The default option is “System” which uses the text size you have set for your smartphone. You may also choose Large or Largest to change the size of the text within the WayAround app. This will not affect any other apps on your device.
Helpful Resources
The last section under Settings is Helpful Resources, which provides links to our YouTube channel, Community Forums, and Help Center. If you need more WayTags, click the link at the very bottom of the Settings page to go to The WayAround Shop.
After you finish optimizing your settings, click the back arrow at the top left to get to the main screen.
For Android Users – Turn On NFC
One quick note for those using an Android device – you will need to be sure NFC is turned on for your device. NFC is always turned on for iOS users, and it cannot be turned off.
Step Three: Scan a WayTag Package
Estimated time: 1 minute
Now it’s time to scan a WayTag! All WayTag 25-packs and Starter Kits come with a WayTag in the top left corner of the package label. Look for the white circle with the black WayAround logo, or simply hold your device near the top left corner of the label.
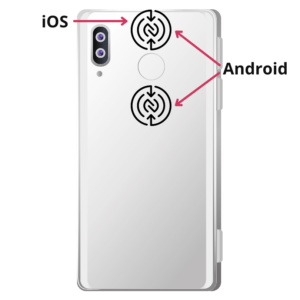
 You’ll need to know which part of your phone to tap against the symbol. If you’ve used tap-to-pay or scanned an NFC tag, then you know exactly where to tap your phone. These tips can help you find where to tap:
iOS
Tap the top, center of the back of your phone to the symbol.
Android
The location of the NFC reader will vary depending on which type of device you have. Most likely, it is either at the top, center of the device or near the fingerprint sensor.
Ready to Scan?
Tap your phone against the top, left corner of the packaging label and hold it there until you feel a vibration. It should only take a second for the info to appear on your screen. The scan will be faster and more accurate if you touch your phone to the WayTag. It’s usually fine if you have a case on your device.
If you are using a screen reader or if you have the Speak WayTag setting turned on, you will hear the audio labels for the blind. Pretty cool, right? Once you’ve read a WayTag, you’ve mastered the hardest part of using WayAround! You will use this same tapping gesture to read and write information to your WayTags.
Step 4: Decide Where to Start
Estimated time: 3 minutes
This is the fun part: labeling YOUR things with audio labels for the blind. A lot of WayAround users start with clothing, food, or medication. Other users label their electronics and cables, plants and seeds, or even livestock! A good rule of thumb is to add a WayTag to things you find yourself having to ask about often. “When does this milk expire?” or “Are these pants black or navy?” That’s a great place to use a WayTag!
For many people, this is the hardest step. You may be ready to tag everything, and over time, you can! But you don’t have to label your entire pantry or wardrobe in one afternoon. For now, it’s best to start small. Pick a couple of things and get started.
Pause now and find the item or two that you want to label. We’ll walk you through how to label in the next step.
Step 5: Create a WayTag
Estimated time: 2 minutes
First, attach the WayTag to the item you plan to label. Sometimes you can apply the WayTag directly to the item, as in the case of a sticker or magnet. Other times, you may need to use an accessory like a rubber band or safety pin.
Once the WayTag is securely attached, it’s time to add some information! When you first start labeling with WayAround, keep it simple and add just a description. The description helps you identify the item and is the first thing you will see or hear when you scan a WayTag. The description can be as long or short as you want. Later, you can edit a tag and add more details. Once you’ve added the information you want, select the Write button at the bottom of the screen and tap your device to the WayTag. You will feel a vibration and see a message that says, “Success! WayTag written.”
Our YouTube channel is a great resource for ideas of how to tag with WayAround and how to use WayAround in combination with other organizing strategies. Setting up any organization system will take time, so block out regular intervals on your calendar to tag a few more things. You can also schedule time with friends or family members to tag things together.
Congratulations, you did it! You wrote your first WayTag, and you’re now on your way to getting better information. Tell us in the comments below what you tagged – we’re here to cheer you on!

